What is Geometric Dimensioning and Tolerancing (GD&T)?
Published on June 27, 2021

Originally published on fastradius.com on June 27, 2021
Nobody’s perfect, and neither are manufactured components. Manufactured parts naturally have minute variations due to the inconsistencies that occur in the manufacturing process. We can’t eliminate them entirely, but we can control and account for these variances.
Engineers use geometric dimensioning and tolerancing, often shortened to GD&T, to communicate a part’s design requirements and their acceptable deviations. GD&T works through a series of symbols, but what exactly do geometric dimensioning and tolerancing symbols mean? And why is GD&T important at all? We’ll go over all the GD&T basics and more in this article.
What is GD&T?
GD&T is a system of symbols, characters, and standard dimensions intended to communicate design intent between engineers and manufacturers. GD&T defines a part’s features and its allowable deviation from its true or ideal position. The general goal of GD&T is to highlight the most important features of a part and demonstrate how those features connect to the bigger picture.
GD&T covers the geometric dimensions of a component as well as its tolerance values. A part’s tolerance specifies the minimum and maximum limit of deviation for a specified dimension. Creating proper tolerances will maximize the product approval rate and increase the amount of properly machined parts. Tighter tolerances are more precise but can raise production costs, so product teams should create tolerances with as much leeway as possible while maintaining product functionality.
GD&T is essential to manufacturing precise and functional parts, plus it enables anyone to read and understand a component’s dimensions. GD&T follows the same process across manufacturing methods, from additive manufacturing to CNC machining to injection molding. However, certain aspects of GD&T will be more relevant for some methods than others.
GD&T characteristics
Before we dive into GD&T symbols, we have to go over the Datum Reference Frame (DRF). DRF is the 3D coordinate system on which GD&T dimensions live. A datum itself is typically a point, line, or plane on the DRF used as the starting mark for measurement. A datum feature is the actual physical element itself. Put more simply, the datum is the ideal, perfect dimension whereas the datum feature is the real, naturally variant component element.
GD&T symbols cover dimensions and tolerances as well as shape, size, and other aspects of a part. By communicating design intentions, GD&T symbols help ensure the part is made exactly how it should be. This ensures the component will fit the role it’s designed for, match up with any mating parts, and remain consistent with its fellow components.
There are five different groups or “tolerance types” with geometric characteristics in each one:
- Form specifies shape and refines the size of a part. A part’s form can be described according to straightness, flatness, circularity, or cylindricity. Form does not use a datum reference.
- Orientation controls the tilt of a part’s surface, axes, or median planes. A part’s orientation can be described according to angularity, perpendicularity, or parallelism. Orientation tolerances require a datum reference.
- Location describes the center point, axis, or median plane of a feature. A part’s location can be described according to concentricity or symmetry, which are derived from a feature’s median point. Location can also describe a part’s position that is oriented around a size feature’s center point, axes, and median planes. Position also controls orientation.
- Runout controls a circular part’s surface coaxiality, which indicates how much a feature can vary with respect to its datums. A part’s surface can be defined according to total runout or circular runout, both of which control the surface’s form and orientation. Total runout is used to control the angularity and straightness of your design’s entire surface, while circular runout is used to account for a wide variety of different errors.
- Profile specifies the tolerance zone around a specific surface, which controls a surface’s size, form, and orientation, and is often based on a datum reference. You can define a part’s line profile or surface profile.

Understanding the Feature Control Frame
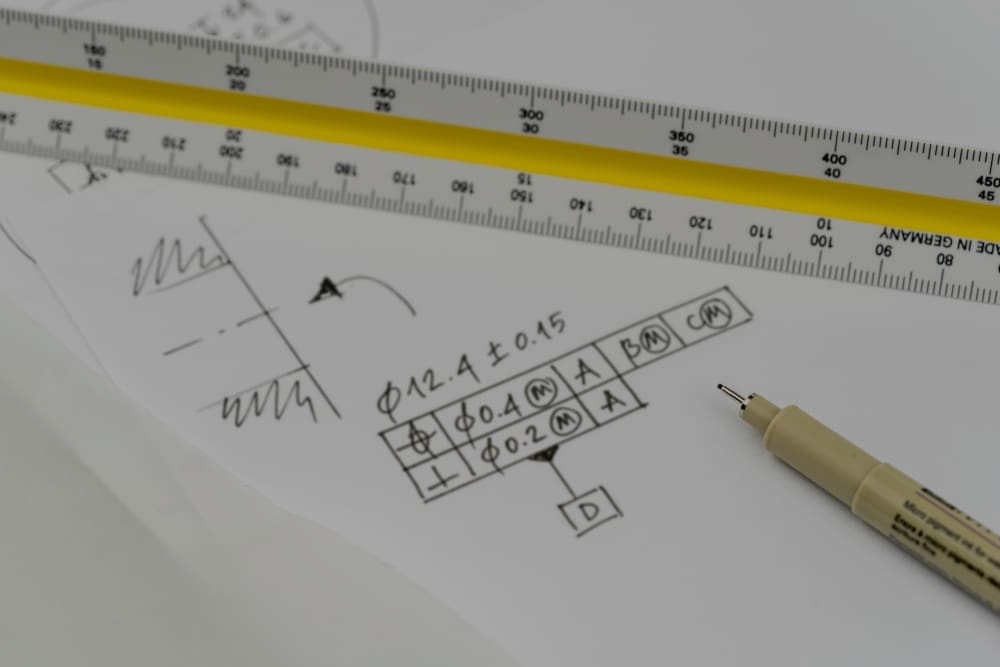
Another important part of reading GD&T is understanding the Feature Control Frame. Feature Control Frame symbols show how everything defined with GD&T fits together. In the frame, you’ll see a symbol followed by an allowable tolerance, as well as any Feature Control Frame modifiers for part design. This enables machinists and manufacturers to make adjustments based on where other features need to go.
Each Feature Control Frame contains only one message or design requirement. This means if a feature requires two messages, you’ll need two feature control frames to communicate design intent through GD&T. A GD&T Feature Control Frame has up to five compartments: the first compartment contains one geometric characteristic symbol, which dictates the part requirements.
The second compartment relays the total tolerance of your design, and an “ø” symbol preceding the tolerance value indicates a cylindrically-shaped tolerance zone with a diameter of the indicated value. The third, fourth, and fifth compartments contain the datum reference features, if they are necessary. Usually, the datum feature defined in the Feature Control Panel indicates how the part interacts with or assembles to mating parts or which features are most critical to functionality.
The Feature Control Frame compartments may also contain material condition or material boundary modifiers, which inform the size and specifications of the feature or datum, allowing for even greater ease of manufacturability when used correctly. These sections give manufacturers insights into how precise they need to be when following the given GD&T data. By clearly communicating part features and requirements, the Feature Control Frame defines measurements’ allowable variance in order to build functional components.
GD&T benefits and guidance
There are many benefits to using GD&T in your part designs. Primarily, GD&T provides clear communication between manufacturing vendors, designers and engineers, and quality inspectors. Describing product geometry by its intended functionality and manufacturing approach is simpler than describing all of a part’s characteristics in linear dimensions.
Since GD&T symbols can capture the dimensions for non-linear features, GD&T data helps paint a complete picture of your component. You can also increase your tolerance knowledge for improved control features, such as curves. Optimizing part tolerances makes a component easier to manufacture and maintains reliability and consistency between individual components.
Defining GD&T data helps ensure separate parts will fit together and work properly. However, there are some guidelines and considerations you should keep in mind when creating and implementing GD&T data.
Be conscious about your datums. Choosing reference datums that are easy to measure from will ease manufacturing.
Balance your tolerances. Think about how precise a specific part feature needs to be and adjust the tolerance accordingly to save costs and streamline manufacturing. Make sure your tolerances are in machineable limits, follow given standards, and account for tolerance stacking. Since parts interact at their final assembly, make sure the GD&T requirements per part are within the allowable stack up of the interfacing assembly when combined.
Don’t over-dimension your part. An unclear part drawing defeats the purpose of GD&T, which is to clarify and streamline communication. Over-dimensioning could make your part design harder to understand and your components harder to manufacture, plus conflicting dimensions can accidentally bring errors into your parts. Be judicious and intentional about which features you’re calling out in your GD&T design and only highlight the necessary information or “critical interfaces” of your component.
Optimize GD&T with SyBridge Technologies
Creating clear, understandable GD&T designs is critical to ensuring your parts come as close to perfect as possible. However, it can be difficult to manage all the moving parts of GD&T and ensure clarity, consistency, and precision throughout your component designs. Working with a seasoned manufacturer can help you optimize your GD&T designs, streamline production runs, and create better parts.
At SyBridge Technologies, we can guide you through the GD&T process from start to finish. Our team of experts has in-depth knowledge of the fundamentals of geometric dimensioning and tolerancing, and we’ll help you design parts using the right standards and symbols to promote part accuracy. To bring expert GD&T to your next part design, contact us today.


