
Originally published on fastradius.com on September 25, 2020
Injection-molded parts can go through numerous iterations before they’re ready to go to market, but perhaps none are as important as the T1 sample. While the T0 sample is usually put together just to ensure the mold works as it’s expected to, the T1 sample refers to the first instance in which an injection-molded is put together in its entirety, complete with surface finishes. The sample parts coming of the T1 sample run represent the first opportunity product teams have to truly dive into whether or not the part meets engineering requirements, note any surface finish imperfections, and more.
Of course, the more potential flaws that teams are able to identify and correct in the T1 sample, the fewer additional sample runs will be needed on the way to developing a finished product. That’s why the T1 sample is so critical, and why properly identifying flaws at this stage can lead to drastic time and cost savings. With that in mind, here’s how product teams should approach injection molding debugging to ensure better outcomes more quickly.
The injection molding process — as simple and cost-effective as it is — demands a number of design considerations. It’s easiest to get the product design right upfront, understanding the manufacturing requirements and ensuring the part’s specifications will align with the injection molding process.
A misstep with any of these variables may lead to a defective part — but it’s far from impossible to fix those defects before the part goes to market.
While getting every element right in the initial design process is certainly optimal, debugging the T1 sample is the next best thing. What’s more, even flawless designs can ultimately produce imperfect T1 samples, as it can be difficult to predict aesthetics before producing the sample. Fortunately, teams that are skilled at debugging their T1 samples can still keep their cycle time to a minimum and their part cost low.
It’s not uncommon for a T1 sample to have a defect — but identifying and addressing it at this early stage can make all the difference in a project’s overall cost and speed. All problems arise from a disconnect between the part’s requirements or intended function and the injection molding manufacturing requirements; addressing these problems quickly requires an in-depth understanding of both the “ideal” product and the current product.
Many defects are visual in nature and can therefore have fairly easy fixes. Others may have to do with the part’s performance or dimensions, which will almost certainly be more difficult to remedy or bypass, resulting in a more expensive tool rework. Common problems include:
Short shots refer to parts that are incomplete because the mold cavity was not completely filled during the injection process. Short shots are not typically the result of poor design; they occur due to poor material flow or a problem with the injection-molding machine itself. Checking the machine and selecting a material of lower viscosity can help.
Flow lines are ring-shaped bands that appear on the surface of the molded part. They occur when molten material inside the mold cools too quickly, becoming more viscous, and is then pushed by a material of lower viscosity that is injected afterwards. Flow marks can be avoided in later samples by increasing the injection speed or raising the temperature of the mold.
Silver streaking, or white stripes on the surface of the part, indicate that the injection molding material came in contact with another material — whether water, air, or remnants of another polymer — inside the mold. Thoroughly drying the material may eliminate this problem. In addition, you can evaluate the mold design to make sure it has the venting necessary to allow moisture and gas to escape.
Messy, visible weld lines occur when the material in the mold splits off and flows in separate directions before converging again, resulting in a bubbling weld line at the convergence point. This may occur due to venting difficulties in the mold or because the material isn’t sufficiently melted within the tool. Raising the temperature of the material, choosing a lower-viscosity material, providing a gas vent, and properly placing the gates could all potentially help.
Voids refer to holes within the molded part, which occur due to rapid changes in density or the presence of air in the mold. Sink marks, or collapsed surfaces on the part, occur due to the same molding mishaps. Increasing the injection pressure, lowering the mold temperature, or selecting a highly viscous material can help to counteract rapid density or temperature changes.Adding venting to the tool near the affected areas will also allow gas to escape, which will help avoid marks.
If the part sustains damage during the ejection process because it would not release from the mold, a design problem may be the culprit. Ensure there’s sufficient draft and that no undercuts are present. If the design is not to blame, the cause may be too much residual pressure from the molding process — manufacturers or product teams would do well to decrease injection pressure for the next sample.
It’s vital to identify any defects at this early stage, whether they indicate problems in the design, material, or mold; the more quickly flaws can be addressed, the more quickly a part will be ready for its intended end-use.
No matter the project at hand, product teams will benefit from partnering with an expert manufacturer like SyBridge. Our team of expert engineers and designers act as liaisons between product teams and tool-makers, elevating efficiency and ensuring issues are resolved in a timely and cost-effective manner.
In short, SyBridge is dedicated to helping every team achieve its goals within its desired timeline and budget. Taking an agile approach, our team of highly experienced and qualified engineers helps customers debug, modify, and adjust their designs to produce high-quality parts, fast. If you’re interested in learning more about injection molding services, contact us today.
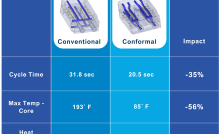
Forget typical cycle times. We're pushing the boundaries of conformal cooling. While traditional approaches deliver…
Forget typical cycle times. We're pushing the boundaries of conformal cooling. While traditional approaches deliver…
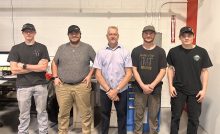
From left to right: Brayden Janak (apprentice); Logan Vifaquain (CNC machining, Programming and CMM); Ron…
SyBridge Technologies is proud to announce we have been awarded the 2023 General Motors Supplier…
Today, designers and engineers are accustomed to working with digital tools in their day-to-day jobs.…
Optimizing Your Injection Molding Process for Cost-Effective Manufacturing Excellence In today’s competitive landscape, manufacturers are…